How to Create Unity Libraries For Use Across Your Projects
I’ve been working in Unity now for almost 6 years. Over the last two years specifically I’ve grown to the point where I actually develop code that’s generic enough that I can bring it around with me from project to project. With each project I have been able to develop more and more code towards these little libraries that I’ve developed. Now, this folder of scripts is the FIRST thing that I import into my projects.
The problem here is that when I alter these scripts, the changes don’t persist over to my other projects. My capacity to track, update and share these libraries is also quite limited in their current state. Frequently, I make an update to my library in one project, only to try and use the functionality in another project and the changes were never pushed into this version. Then it becomes a chore of figuring out which project it was added into, and then manually merging it with any new changes that might only exist in THIS project.
Clearly, this isn’t the best way to work on and include these kinds of libraries, really you would like somewhere that you can have a single version that all of the projects share. And luckily for us, doing EXACTLY this inside of Unity is actually a walk in the park!
The way to achieve this, is to use what’s called a “Unity Package” these are effectively one-and-the-same as the other packages such as Text Mesh Pro, Device Simulator, Cinemachine, or anything else found inside of the Package Manager window.
Now, in terms of creating and storing this package, there are two main methods, the first is a local store, but alternatively you could also host the package on git. The plus side to the local store is that you are able to easily link to one version on your system and simply and hassle free update the files once across all of your projects. The downside is that if you share your project with others, via source control. Your team members won’t have access to these files. For this reason, I recommend hosting with git, even though the update process of these files will be more tedious.
We’ll first go through the process of creating this package, and then I’ll talk about how to host with git.
Creating a Unity Package:
Creating a Unity package couldn’t be easier! All you need is your code, or whatever you plan on packaging, make sure to put all of that into a folder that you plan on ripping from your game later on.
Make sure that you are creating all of these files within Unity, the reason being, that you will need all of the .meta files that Unity generates. If Unity can’t find these files, it will chose to ignore the base file that the .meta is linked to. So just make sure when working, that all of your .meta files are generated in the file explorer, and when you copy out the files to another directory, make sure to take the .meta files with you!
Once you are in the folder in Unity, create a package.json file and open it up in a generic editor. There are only a couple of fields you “need”. (In actuality you only NEED name and version, but you should supply all of the following):
name
displayName
version
description
unity
Optionally, you can also supply the following fields:
author (object)
changelogUrl
dependencies (object)
documentationUrl
hideInEditor
keywords
license
licensesUrl
samples
type
unityRelease
However, most of these are not necessary in the slightest. Here is my example package.json file.
"name": "com.chrismccole.static-utilities-scripts",
"displayName": "Static Utility Scripts",
"version": "1.0.6",
"unity": "2019.1",
"licensesUrl": "See LICENSE.md",
"author": {
"name": "Chris McCole",
"email": "chrismccole1@gmail.com",
"url": "https://www.chrismccole.com"
},
"description": "Basic utility scripts that I import into all projects.",
"dependencies": {
},
"keywords": [
"Utility",
"Tool"
]
}
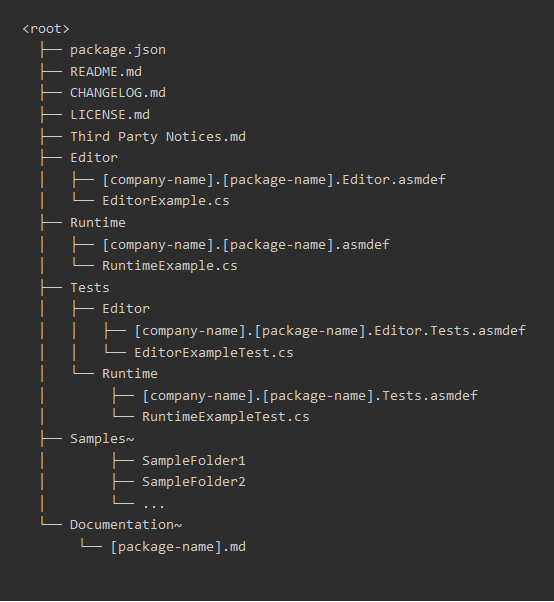
Folder Structure
The only other thing Unity recommends, is that you place your files in a specific folder structure. And that would be that you have your root folder, and that contains the following:
package.json
README.md
CHANGELOG.md
LICENSE.md
ThirdPartyNotices.md
Editor/
Runtime/
Tests/
Samples~/
Documentation~/
The reasoning for the ‘~’ character at the end of the samples and documentation folders are so that Unity will not generate and track these with ‘.meta’ files. You can see the image from their documentation here:
Upload To Git
The next step of this process is to upload you package to git. Just make sure that you upload ONLY the package, and not the entire Unity Project. In order to keep this distinction clean, I like to keep separate folders for my git repository (for the project) and one for the actual package. Just make sure to copy over EVERYTHING whenever you move over to the package folder, make sure to bring all the .meta files, as Unity needs these for the package.
You can check out my git package for my repository here: https://github.com/cjm399/Unity_UtilityImports
Import The Package Into Unity
The simplest way to do this is to open unity, open the package manager, and in the top-left corner, select to add a custom package from a git url.
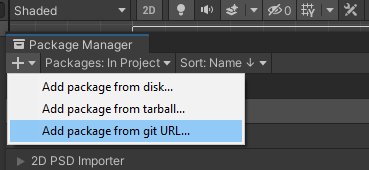
From here, then paste in your html, or ssh git url, in my case, this is my url: git@github.com:cjm399/Unity_UtilityImports.git
I will say that, whenever I make a new project, it can be kind of annoying to go and fetch my url and go through this process. I have also noted that unity is REALLY BAD at updating the packages when I make a change. So I highly recommend making an Editor Tool to automatically pull in your git packages. I will explain how to do this, although it will be brief, as this is not an editor tool script tutorial.
However, you can view my script here: https://gist.github.com/cjm399/bee153828184eb51e1c44cb6f9026f41
The only thing you need to note about editor scripts is that they NEED to be placed within an “Editor” folder within your Unity “Assets” folder. As you can see from the script, I am simply, through code, adding the url to the package manager. When you go to open up your visual studio project, it will re-import and upgrade the package to whatever the newest version is!
Additional Links
For more information about creating packages and uploading to Unity, here are some additional documentation links:
Creating Custom Packages In Unity
Package Layout in Unity
Meeting Legal Requirements

