Localization in Unreal Engine (UE4)
Last month I delved into Localization in Unreal for the first time. I’ve only worked on one released Unreal Engine game (Howloween Hero) and we are only now adding in localization for other languages. The process while seemingly daunting, was actually quite simple. The whole process can be broken down into 8 steps:
In the Localization Dashboard, add the cultures that you want to support.
Gather the text.
Check text for duplicated strings and fix. (optional, but a company will charge you per word, so fixing this is beneficial).
Export the text and translate (use PoEdit for cheap, fast, bad translations).
Import and Compile the text.
Fix Widget scaling and fonts.
Test the game.
Package the game.
Here, I’ll be walking through each of these steps, and how I was able to get localization inside Howloween Hero, and shipped on Steam within a few days.
The Localization Dashboard
So, I’m going to combine the first couple steps I listed above into this one step here, as they are all fairly simple.
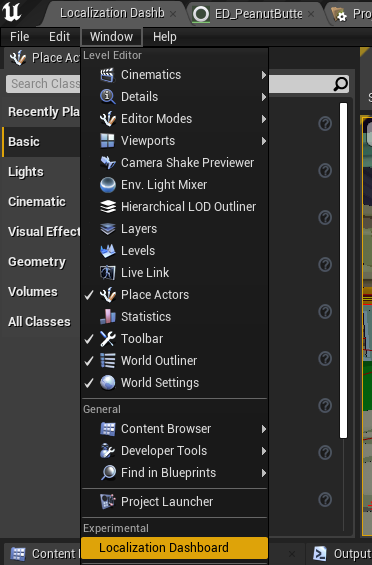
First, you will want to open the Localization Dashboard. This can be found under Window->Localization Dashboard.
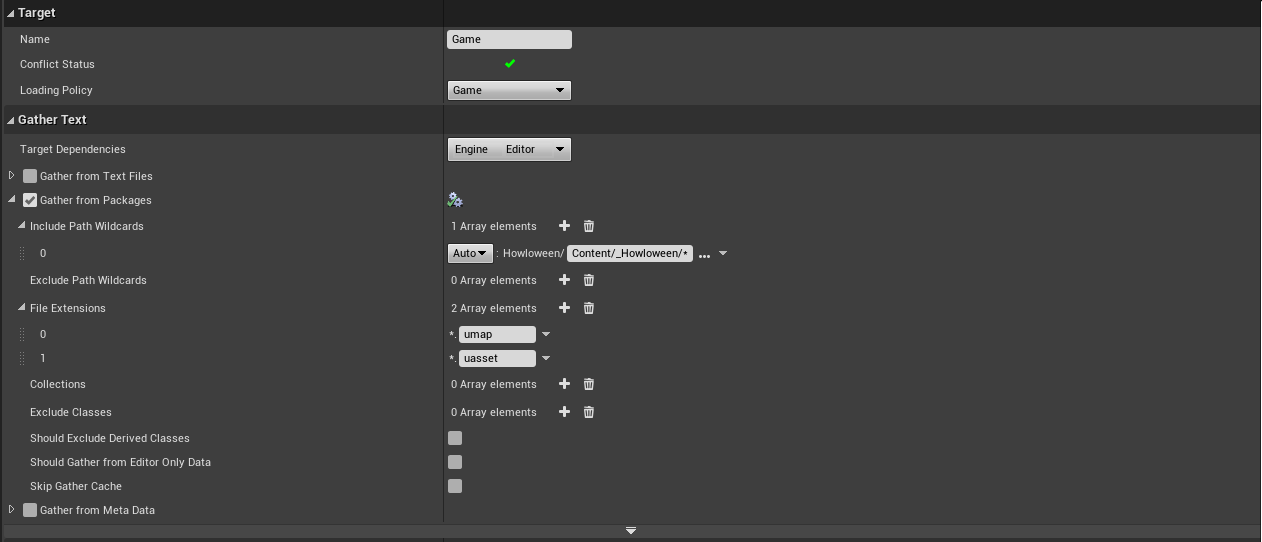
Once here, you will want to do two things, you need to specify the Cultures that you plan on supporting, and set the search paths for the engine to find your text. First, we’ll add the cultures, as that is very simple.
At the bottom of the screen, you will want to click the “Add New Culture” button, then select the culture (or sub-culture) you want to support. For instance, I might pick “German” as a culture I plan to support. Make sure that when you have multiple languages marked that you’re native language is still marked as the “Native” language in the cultures section.

Next, we have to specify where to search for text in our game. Above the Cultures section, there is a “Gather Text” section to mess with. For any .cpp, .h, .ini or other files you will want to specify where to search for these under the “Gather from Text files” section. For any .uasset or .umap files, you will want to use the “Gather from Packages” section. In either section, you should notice a File Extensions section, which already list the extensions I listed above, if you have other files extensions to add here, go ahead and supply them. The other thing you will need to supply is the “Search Directories” or “Include Path Wildcards”, in most cases, this should be pretty straight forward, I only needed my .uasset and .umap files to be searched, and they all happened to lie within the Howloween/Content/_Howloween/ directory. So supplying Content/_Howloween/* will allow it to search down all the folders and files and sub directories within that folder.
Once your search areas and cultures are added, you should be ready to hit the “Gather Text” button from the Cultures section. This might take a while to run depending on how big your project is, and how specific you made your search paths. But in the end, it should collect all your text from all of your assets!
IMPORTANT NOTE:
I keep saying that this will gather “All of your Text.” It’s important to note that this will only gather all of your “Text” objects which is a variable type in Unreal Engine that is meant to be localized. Any Widget blueprints text fields will automatically display text in this type, but it is worth noting that if you are creating strings or storing them as String, or Name types, this will NOT gather that for localization. For text to be gathered as part of localization it NEEDS to be of the type Text.
Once you have gathered all of your text it should look something like this, although I already have many translated words:
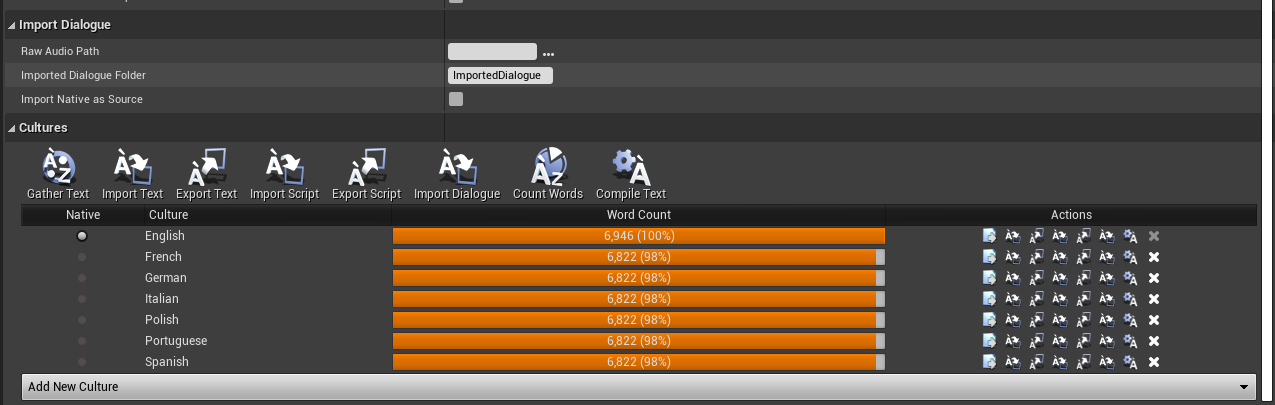
Now, you should have a bar next to your native language that is filled orange! This is because all of your native text is already translated properly, as it is your native language! However, German should show up with 0 words translated. If you click the button to the right of this bar, it should bring up a n “Edit Translations For This Culture” window. This is really cool, as it shows you all of the text that was found, which texts are translated, which are not, and where these texts are located in your game. The Context that shows you where the text lives in the project is INCREDIBLY useful in determining where to get rid of duplicated, or unnecessary text. That’s the crux of what we’ll be looking at in the next section.
Removing Duplicate Text / Fixing Bad Text
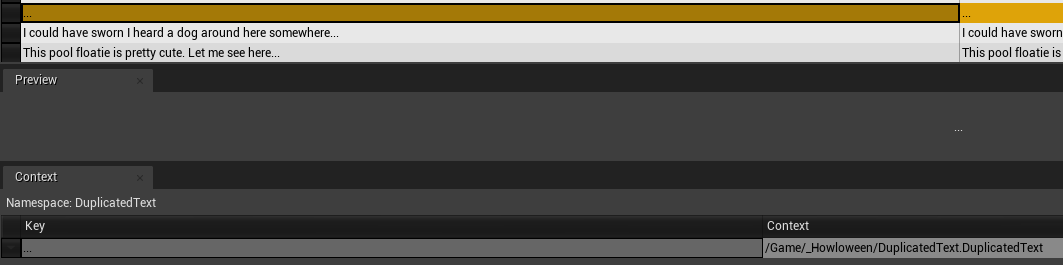
Picking up from the last section. Make sure that you are in the “Edit Translations From This Culture” window, that can be accessed from the “Localization Dashboard” window. Here’s what you need to do, since this list of text is sorted alphabetically, it’s quite easy to see if text is duplicated, just scroll until you find text duplicated two or more times in a row.
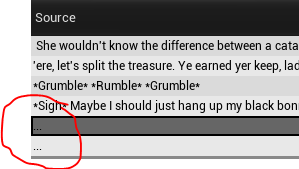
Once you find one, click on it, and in the bottom of the widow is a context view. It will give the key of the text as well as it’s context. Mine for instance shows : /Game/_Howloween/Dialogue/TrickOrTreat/ED_TOT_Vampire.ED_TOT_Vampire:BasicDialogueNode_6.paragraph
which, I’ll be honest, doesn’t always show where the text is as clearly as you may want. It might require a little bit of searching, especially if the text is created dynamically in a blueprint node. However, this is quite simple, I have a dialogue graph created for the Vampire, and it’s located at the path it shows here. So I navigate to the asset and this is what I see when I open it up.

(Let’s pretend this dialogue is really complicated) Just a ton of dialogue nodes, as I said earlier, it may not be the most perfect at telling you where it is, as I don’t know which node, node 6 is, but it gives me an amazing start, and scanning through these nodes for the text I’m looking for should be fairly straight forward.
After a little bit of searching, I’ve found my text! Now what? Well, in my case, I actually don’t need to localize … at all, a … is a … in any language as far as I’m concerned. So in order to tell it not to pick up for localization, I can simply click on the dropdown arrow to the right of the text, and select “No” next to “Localizable”

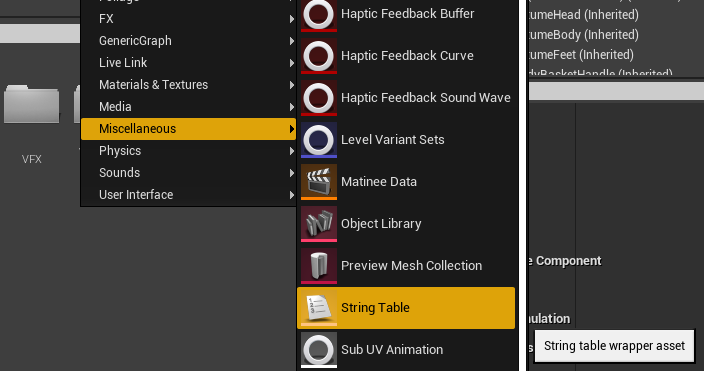
But, because that’s kind of a cop out for this case, let’s assume that I did want to localize this text, but only once, and not twice as it is currently. Well, there is an asset that you can create called a “String Table.” You can create a String table in your Content Browser by right clicking -> Miscellaneous -> String Table. Make sure to create the table in a location within the searchable directories you supplied to the Localization Dashboard earlier!
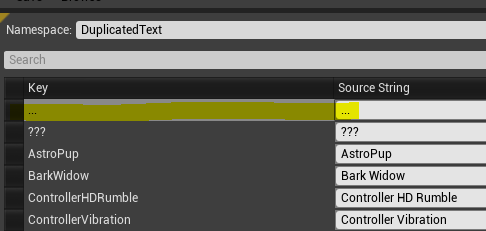
I’ll call my string table “DuplicatedText” as I don’t particularly have any special need of this table other than to remove duplicates. Once you open the String Table asset, you’ll notice at the bottom you can supply a Key, and a Source String. The key is nothing more than a way for you to remember the text, and the Source String is the text that is being duplicated currently. I’ll just mark it as … for the key and … for the string and add it to the String Table.
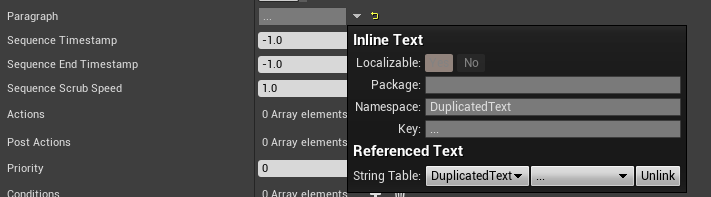
Now, with the key added to the string table, we can go back to where we found it in our asset, and once again click on the dropdown arrow. Although this time, instead of marking it as not localizable, we’ll instead, under the Referenced Text section, add the string table to reference and the key to grab the text from as such.
Not that this is linked up, we should STILL be gather two texts that say “…” one that’s within the string table, and one for the OTHER asset that we didn’t yet link to the string table. So now, all that’s left to do is go to the other references to this text, find them and link them all to the string table. Once that’s done, if you click on the “Gather Text” button in the Localization Dashboard. Then load up the “Edit Translations From This Culture” window. You should see that the duplicated text has been reduced to a single reference that lies within the string table!
Exporting and Translating the Text:
This is arguably the most complex step, as it actually requires knowledge of another language, or money to pay someone for translations. The alternatives would be to translate all the values into bogus, random letters that you make, but this would be bad at letting you visualize the other languages font. I’ve opted to use a service called PoEdit, that gives you translations for 50,000 words a month using DeepL or Google Translate, for $40/year. Allowing you to add more words in 100,000 word increments for $40 more. This gives translations for our game which is around 7,000 words in a couple minutes, and the translations, while not good, are passable. This would be a cheap way to test out localization without paying someone around 10 cents / word (in our case 7,000 x .10 = $700 per language.)
So, feel free to use whatever translation service/company you want, but I’ll be going through my process with PoEdit.
First, we need to export our languages, this can be done simply from the “Export Text” button in the Localization Dashboard next to the “Gather Text” button. Keep the export folder set to the default, and it should generate many folders for each language that you translate to. It will export these as .po files, which is what I use PoEdit to open. *.po files are apparently an industry standard file format for localization.
Once the files are done exporting, open one in PoEdit, the exported files can be found in {ProjectDir}/Content/Localizations/Game/{CultureId}/Game.po. Once you open it, if you have the paid version, you can click on the “Pre-translate” button, and it will make web requests to get translations for all the strings you have and translate them. Once it’s done, make sure to save the file, overwriting the file you opened.
Go back into Unreal and in the localization Dashboard, click “Import Text” and select the Game folder. This should import into Unreal, associated to the proper language. But before this text will show up in-game or in widgets, we need to make sure to COMPILE TEXT, this is done by clicking the “Compile Text” button on the rightmost of the bar in which you Gather, Import and Export text from. Now, all that’s left is to make sure our fonts and widgets are setup accordingly.
Setting Up Alternate Fonts:
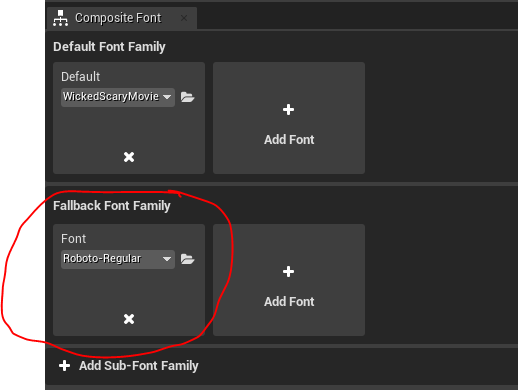
Obviously, it would be ideal to have a font that encompassed all languages, or you could update your font to include these new characters. However, that is quite difficult and time consuming to do. So, the alternate method that is much simpler is to supply a Fallback Font Family to the fonts that you use in the game. To do this, you’ll need to navigate to your font asset in your game, and then click to open it, and you should see a menu that allows you to set the Default Font Family, as well as Fallback Font Families. The simplest font to add is the Roboto-Regular font, which is already included in the engine. Click to add a fallback font, open the folder and select Roboto-Regular, import it into the game, and then make sure that it’s set properly in the font settings as such:
Fixing Widget Blueprints
Now, the final step is to make sure to have all of your widget blueprints configured properly for the new, different length/scale texts that are now imported. The easiest way to see which are messed up for me, are to actually play through the game with a new culture set, and see what widgets look incorrect. However, assuming that you know an asset to fix already, here are the steps.
Open the widget, and in the top-panel, you should see a language dropdown and a globe setting, check the globe orange and set the language to whatever language you want to test against. It should look as such:

Now, my text objects are setup properly, so there isn’t any overflowing, or text jumping outside of the boxes, and that’s because I have my widgets setup to scale properly, that way if I type more characters into this button, and scale it to a new size, it should still fit within the button.
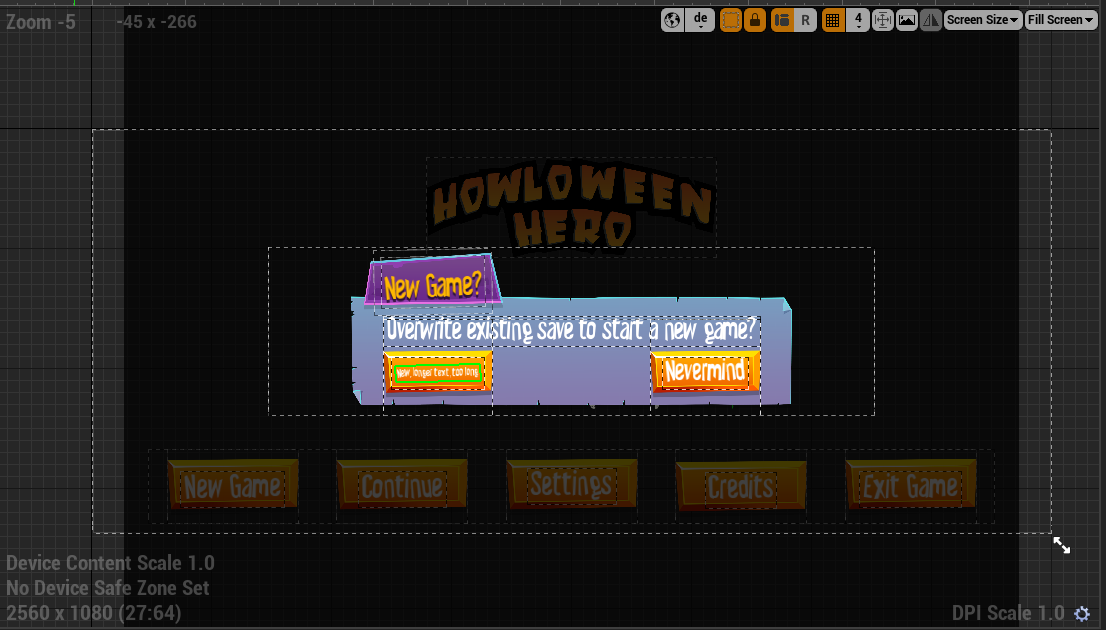
I scaled down the screen to a new aspect ratio and replaced “Proceed” with “New Longer text, too long”, and as you can see the text scales within the button properly. Now, I’ll be honest, I don’t know much about Unreal UI, all I know has been from fidgeting around trying things until they stick. BUT, I will tell you how I achieve this effect, and it has to do with LOTS of nesting. The first thing I assumed when making UI was, I want this text on the button, it should therefore be a child of the button, however, this has never successfully worked for me, as it changes the image scale of the button. So I keep the text and the button separate, just “next to” each other in an overlay. Then, I size the text how I want, and wrap it in a scale box. The scale box, should handle scaling of the text to move up or down depending on the size of the area. And then I wrap that inside of a size box, and se the “Width Override” or “Max Desired Width”, whichever works, to the size that it needs to fit the box perfectly.
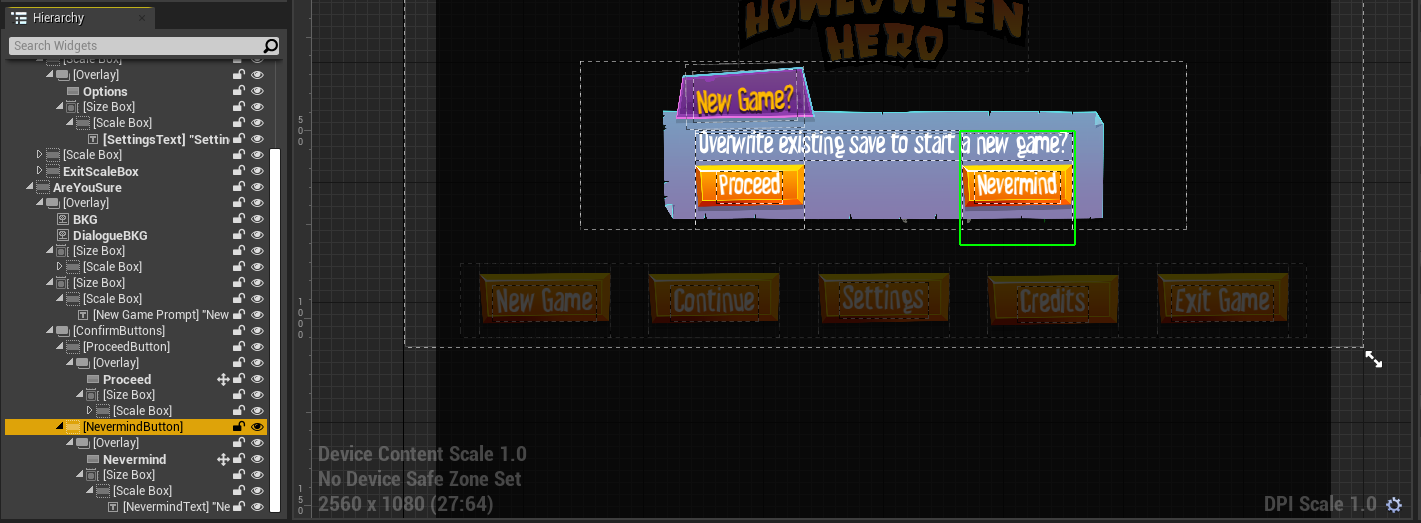
All UI that I made anywhere in this game basically follows a similar workflow, it’s a lot of work, it’s not intuitive, but it works. Whenever I seem to nest something in an overlay and share parents of similar sized items, all breaks. Here is my hierarchy, focused on this “New Game” prompt at the forefront.
Testing Your Languages In Editor
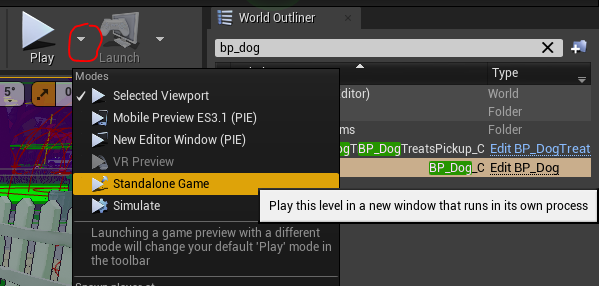
So, now you want to see your languages in editor, that’s great! However, make sure to note that in order to update your language, you can’t be playing in the standard viewport, you must be playing in a standalone game version. To access this as opposed to the regular viewport, select the arrow next to play, and click “Standalone Game.”
Once this opens up, you will be able to play in any language that you want, provided that you have the in-game settings to change the language. If you don’t no fear! You are also able to change the language at runtime in the standalone view with console commands. If you know the abbreviation of your language that is. All you have to do is open the console command line (by pressing ` ) and then type in (without the double quotes) “-culture=de” for German, for instance. With this simple command, you should be able to test out different cultures without having a settings menu made for them yet.
Setting Up Your Language In Settings Menu
If you have been able to do everything above, the only thing left is to allow people to actually select the language they want to use, luckily this is very simple in Unreal, you don’t even have to manually save this data. There are just a few blueprint nodes that you need to be aware of.
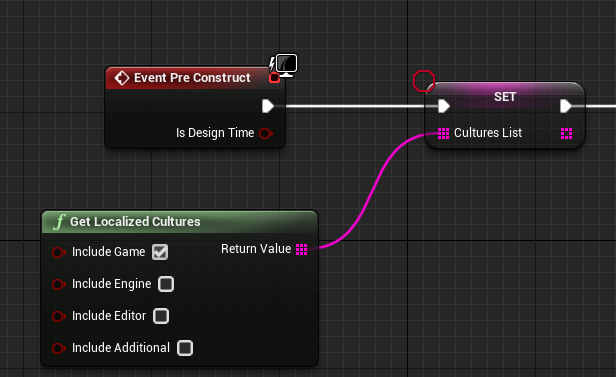
GetLocalizedCultures
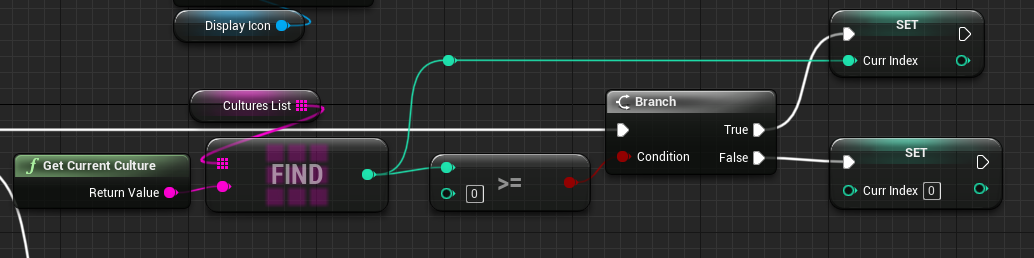
GetCurrentCulture
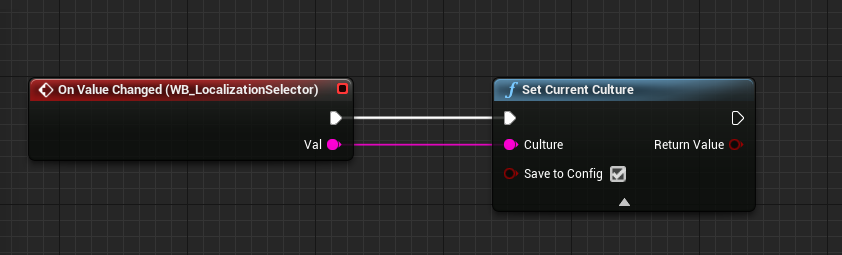
SetCurrentCulture
GetLocalizedCultures will return you the list of supported cultures, this will give you a good list to supply the user as to which languages they can pick from.
GetCurrentCulture will return you the current culture that you’re viewing so that you can set the default already selected value in your settings menu.
SetCurrentCulture will then take this culture string and change the language based on whichever is selected. This has a super handy feature of being able to auto-save into the config file so that you don’t need to manage saving or loading this value, as it will be a config value! Handy!
With these three simple nodes, you should be able to load up the languages required, set the default value, and set a new value.
Packaging For Release
Now for the final step! Seeing your languages in a built game and selecting between them using your settings menu! When I built my first game, I was very disappointed to see that only English was supported, what happened! Well, there are actually two Project Settings that you need to alter before the game will build with the languages successfully.
If you navigate to the Project Settings->Packaging->Packaging dropdown arrow. You will see two settings that need to be updated: “Localizations to Package” as well as “Internationalization Support.”
First, select the Localizations to Package, if you click on the “Show Localized” radio button, it will simplify your list by only including languages that have been compiled in the Localization Dashboard. Select the cultures you support.
Second, you must select the “Internationalization Support.” This value must encompass the languages that are selected in the “Localizations to Package” section, In my case, when localizing German, French, Polish, Italian, Portuguese and Spanish. I selected the “All” option here.
Now, when you click “Package Game” it should package with all the included supported languages!
Conclusion:
While daunting at first, and seemingly many steps, the localization process that Unreal Provides is incredibly simple. The gathering of text in the project, as well as a simple import/export process and simple way to visualize your widgets with localized text is just incredible when compared to something like Unity where it’s much more of a free-for-all and anything goes, and you have to find all the text yourself. They really made the whole process a breeze.
Additional Notes:
I just wanted to bring some other notes, tips, and information to light so here they are in an unstructured form.
Other Localized Assets:
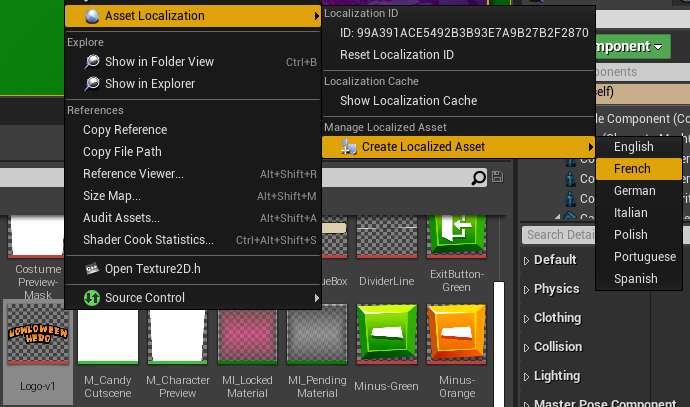
You can also localize textures or other assets in your game, did you know? If for instance, we wanted our logo localized into all the languages that we provide, we can right-click on the texture asset, go to “Asset Localization”->”Create Localized Asset”->Language and create a linked localized version of the texture. The real down side to localized textures is that the map has to reload or refresh in order for textures to update, so we opted to use as minimal textures as possible and have no localized textures, localized textures are also a TON of work, as you would need to manually create, export and import each one
Gather Text Errors:
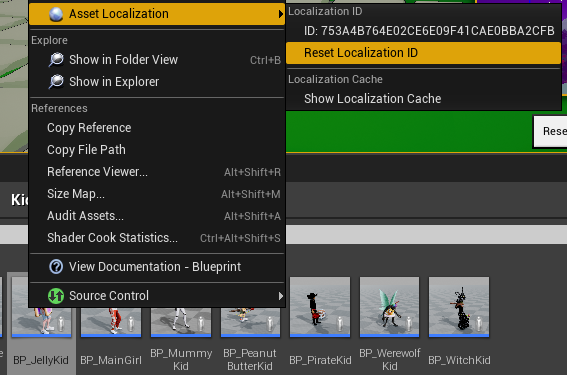
When I went to gather my text the first time, it resulted in errors! I think this was due to me copying and duplicating assets within the content browser in a way it didn’t like. However, in my case, the assets that were setup incorrectly were listed when I clicked on the x under Conflict Status, all I had to do was go to these assets and right-click->Asset Localization->Reset Localization ID. And all was fixed!